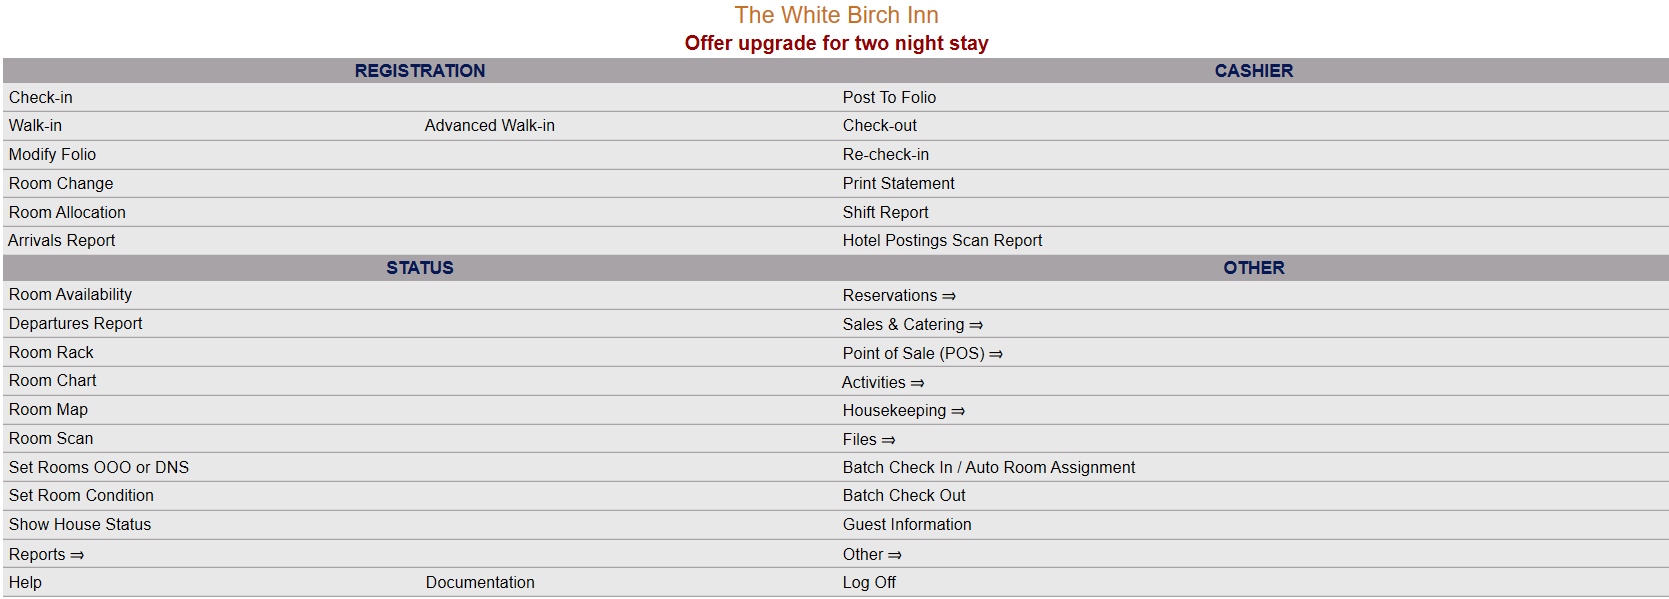
Click the icon on the left for the Full Menu.
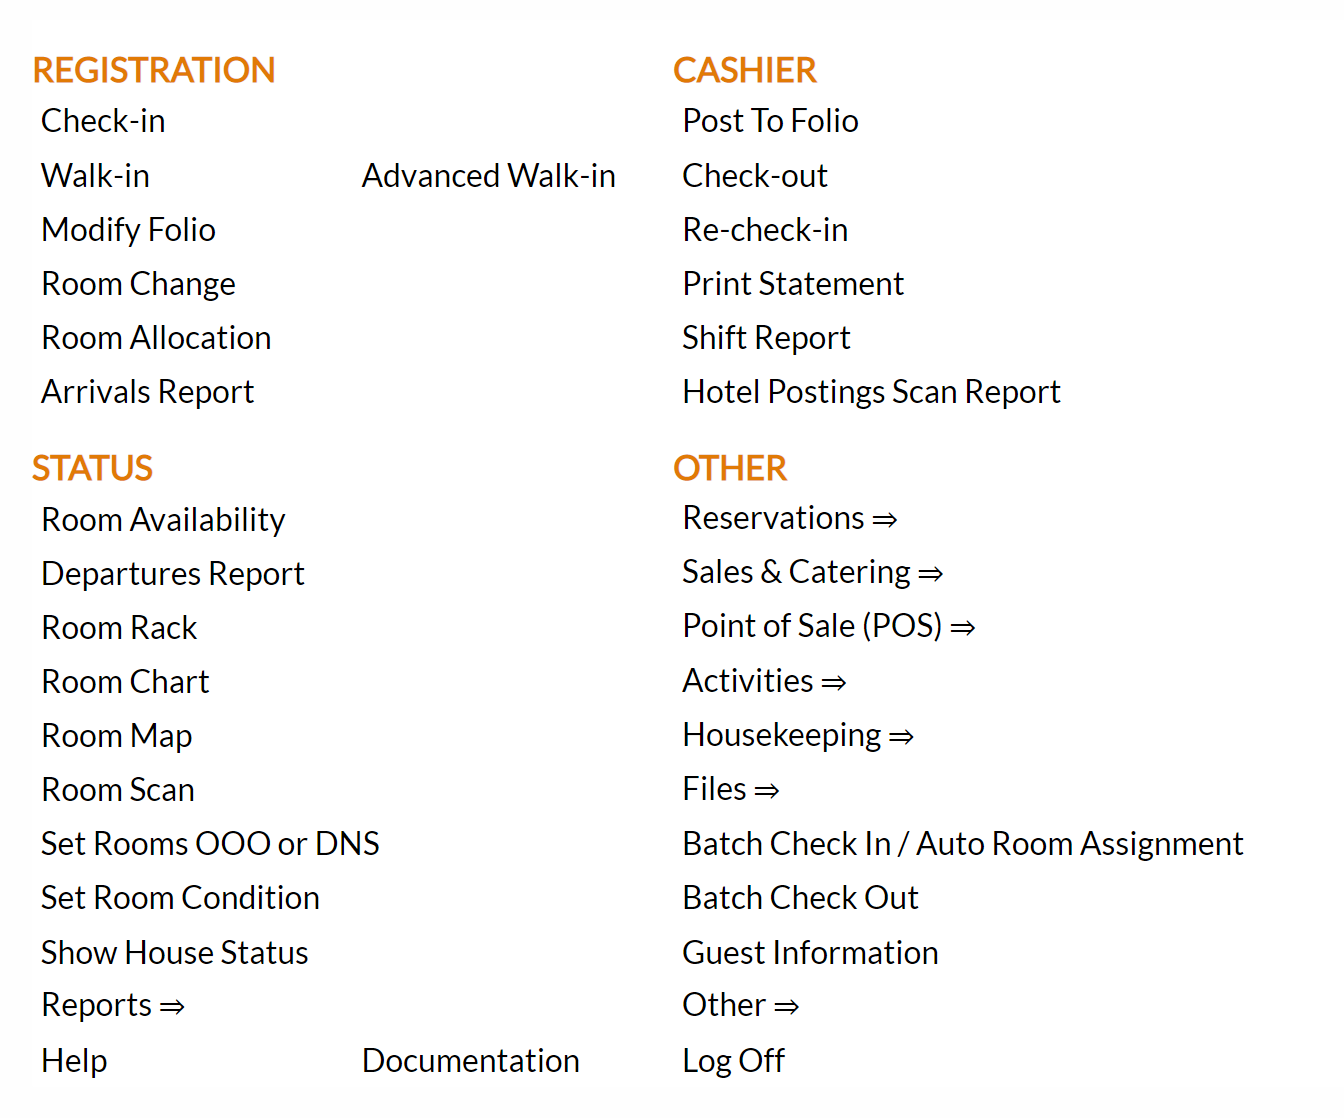
This will display the Full menu in a tabular form, with four sections, Registration, Status, Cashier and Other.
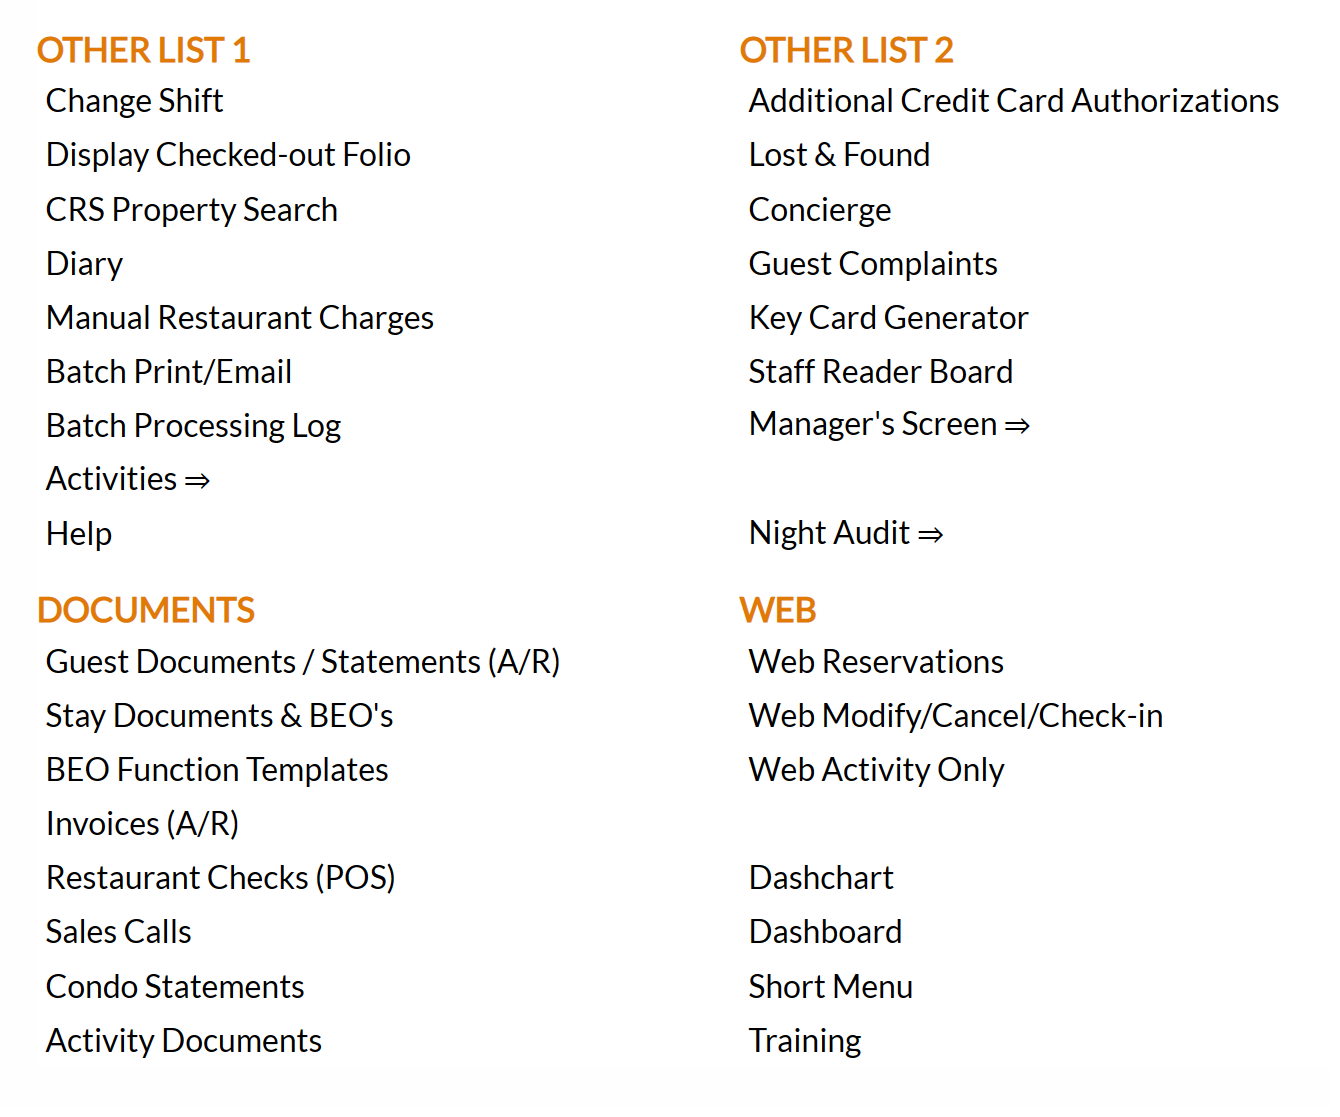
Select Other => from the Other section. This will display the Other Front Desk Tasks Menu, which has four sections, Other List 1, Other List 2, Documents and Web.
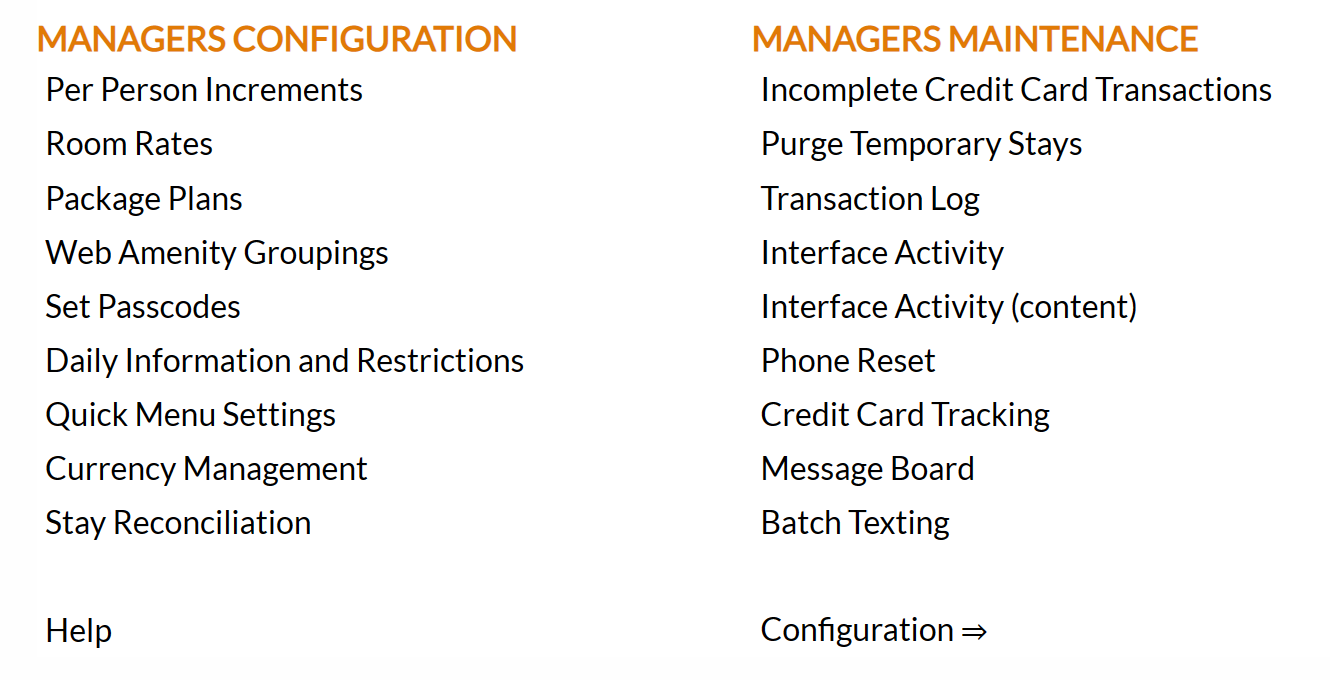
Select Managers Screen => from the Other List 2 section. This will display the Managers Commands screen. The Managers Commands screen has two sections, Managers Configuration and Managers Configuration.
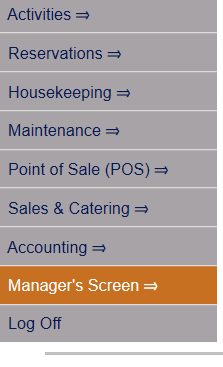
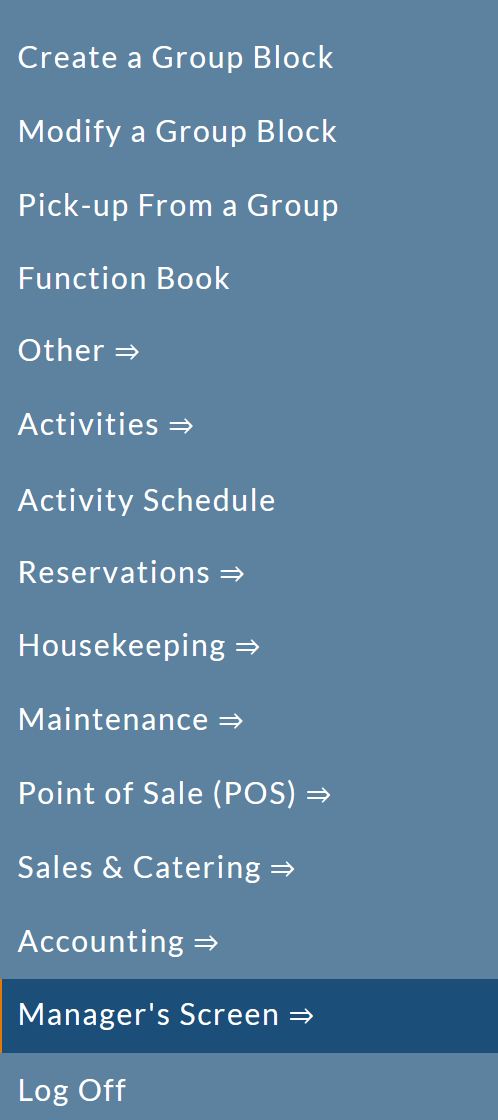
OR: Select Manager's Screen => from the Quick Menu on the left side of the screen, to be taken directly to the Managers Commands menu.
The Manager's Command screen menu has two sections, Manager's Configuration and Manager's Maintenance.
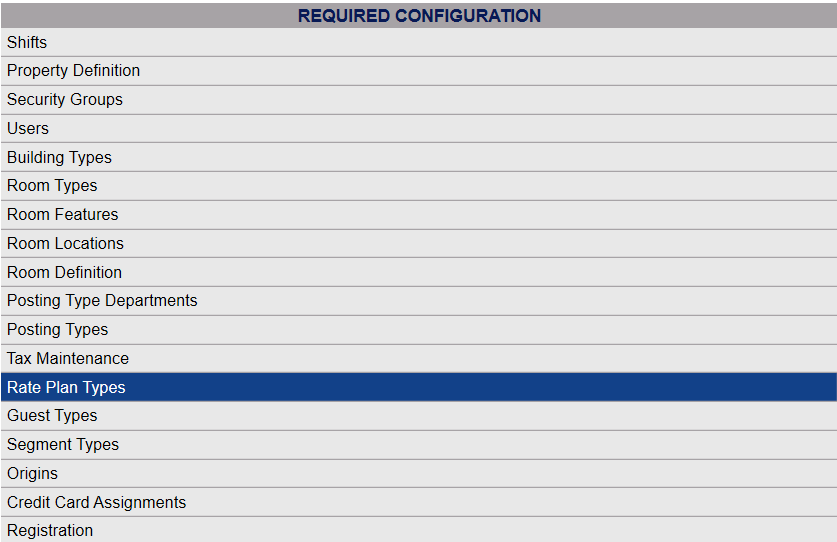
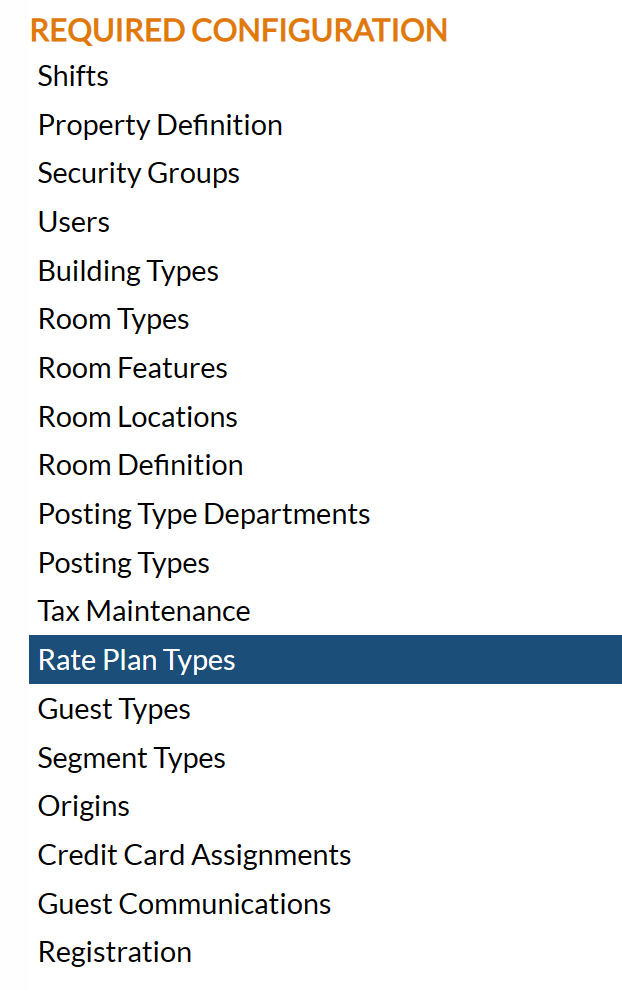
Select Configuration => from the Managers Configuration section to be taken to the Property and System Configuration screen. The list of property configuration options are divided into four sections, which are Required Configuration, Optional Configuration, Locales/Dates and Sub-Systems.
(Alternately, you may also be able to select Configuration => directly from the Quick Menu, if the menu has been set up to include the Configuration option).
Select Rate Plan Types from the Required Configuration section.
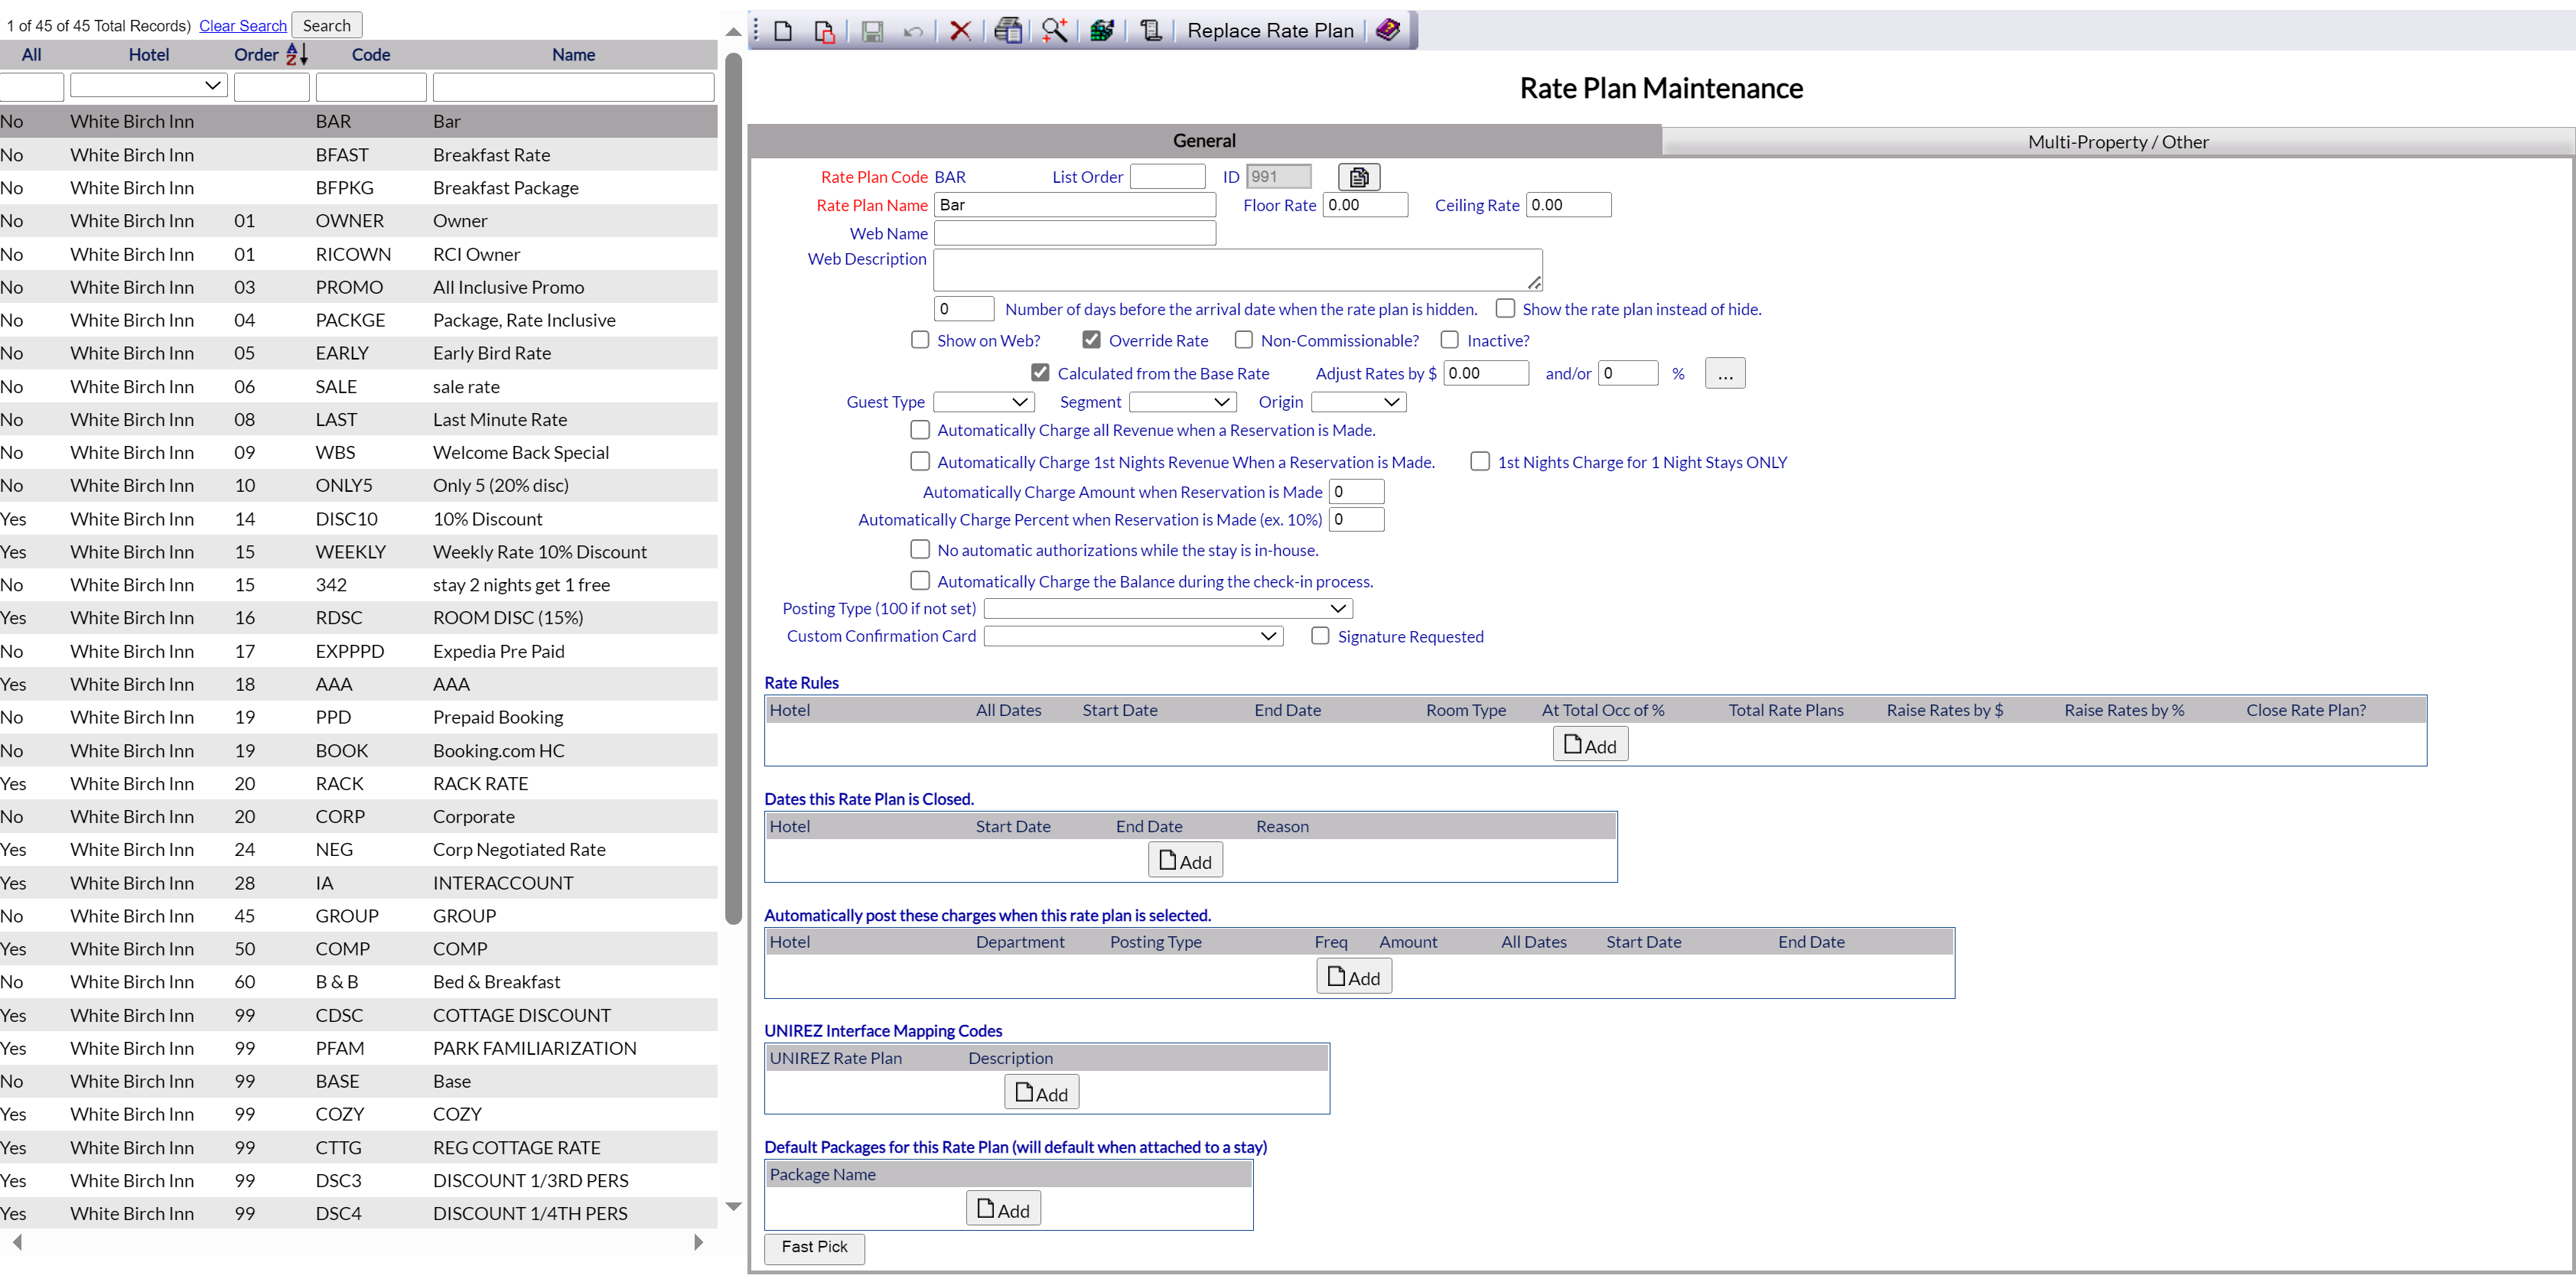
The Rate Plan Maintenance screen display is split into two frames, with the left side of the screen listing any already configured Rate Plan Types for the property and the right side containing the fields you need to complete in order to add or edit a Rate Plan for the property. Any changes made on the right, once saved, will be updated in the listings to the left.
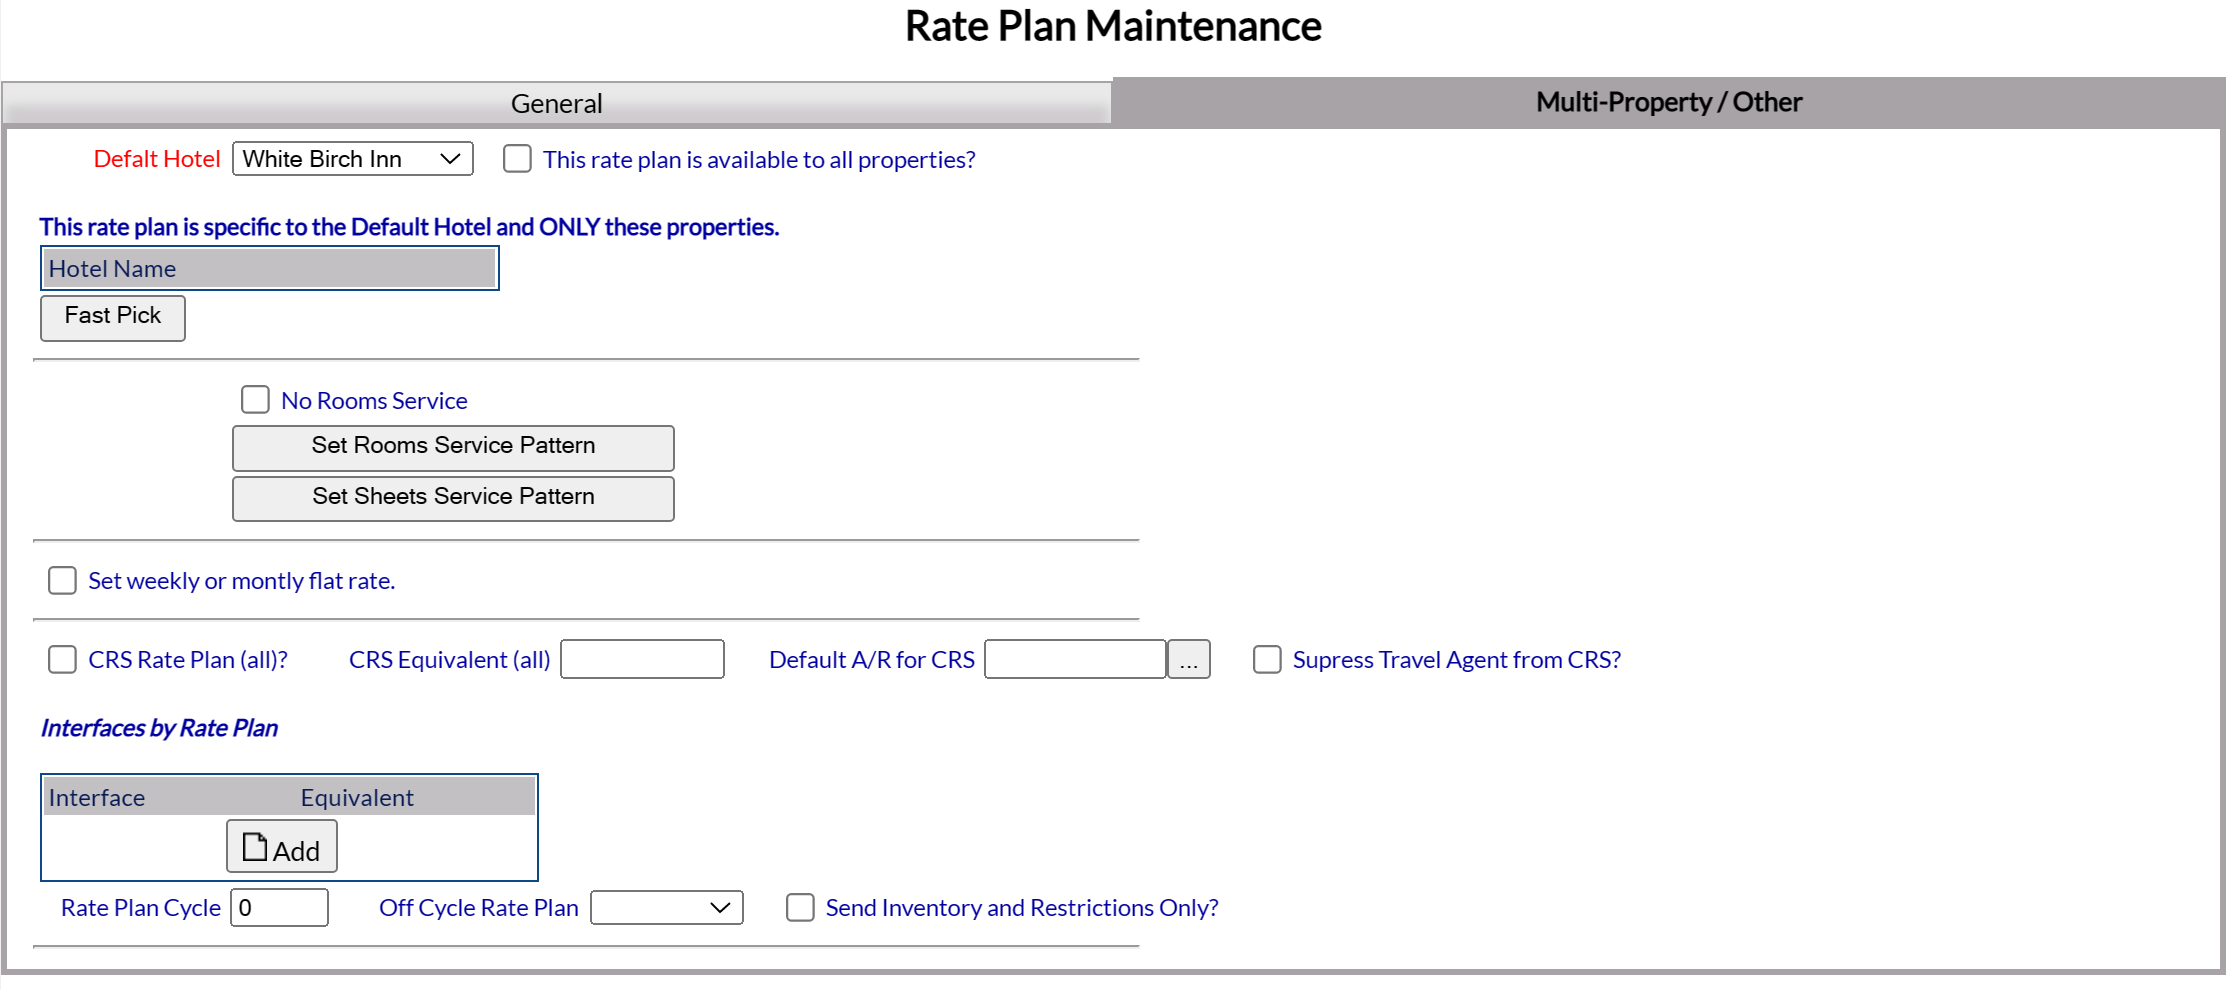
By Default, the General tab will be open when you arrive at the Rate Plan Maintenance screen. Almost all of the required information is located on this tab. The screen also has a second tab, the Multi-Property/Other tab, where information on which Property(/ies) the Rate Plan Type will be available at should be selected, as well as if/how the Rate Plan Type will be used with the various CRS (central reservation system) interfaces available.
The currently configured options are displayed by:
All: This will be Yes or No. If you are a multi-Property Interface user of Skyware Systems, this refers to if the Rate Plan Type in question is in use at all possible properties or one property only.
Hotel: The default Property Name the Rate Plan Type is associated with.
Order: List Order of the Rate Plan Types. If there is no list order number, the Rate Plan Types will be displayed alphabetically.
Code: The short version of a name for the specific Rate Plan Type used for use by your staff.
Name: The actual name or description of the Rate Plan Type.
Selecting any Rate Plan Type on the left will display the details on the right.
Your options include the following:
Generate a new entry:
Click the New ![]() button from the toolbar to add a new Rate Plan Type.
button from the toolbar to add a new Rate Plan Type.
Complete the fields described below.
OR:
Select an existing Rate Plan Type from the list on the left, and click the Replicate ![]() button from the toolbar. Then change the field information as described below.
button from the toolbar. Then change the field information as described below.
Edit the current selection:
Change the field information described below.
Rate Plan Code: The short version of a name for the specific Rate Plan Type used for use by your staff. Enter the code you wish the Rate Plan Type to be displayed in the interface.
This field is required.
List Order: Enter the desired List Order for this Rate Plan Type. If there is no list order number, the Rate Plan Types will be displayed alphabetically.
ID: This is for Internal use by Skyware Systems, and cannot be changed. The ID will be assigned automatically when the Rate Plan Type is first saved in the interface.
Rate Plan Name: The actual name or description of the Rate Plan Type. Enter the name for the Rate Plan Type here.
This field is required.
Copy: When needed, use this button to copy the booking URL to the clipboard for this Rate Plan Type. (A pop-up message from Skyware will appear to inform you that the URL has been copied to your clipboard successfully, for your use).
Floor Rate: Lowest Rate allowed for this Rate Plan. Enter the minimum price allowed to be charged using this Rate Plan Type here. By default the Floor Rate is set at 0.00.
Ceiling Rate: Highest Rate allowed for this Rate Plan. Enter the maximum price allowed to be charged using this Rate Plan Type here. By default the Ceiling Rate is set at 0.00.
Web Name: Name shown to the end-user when making a reservation on-line. Enter the name you wish guests to see displayed on-line, if this Rate Plan Type is to be available using the web reservation system. For example you may want the "Rack" Rate to be posted on the web as "Standard" Rate.
Web Description: Description to be shown to the end-user when viewing the Rate Plan on-line. Enter the description you wish guests to see if this Rate Plan Type is to be available using the web reservation system. (Any information entered here will be displayed below the Rate Plan Web Name row, right justified).
Number of days before the arrival date when the rate plan is hidden: If this Rate Plan Type is only to be available a certain length of time prior to the expected arrival date, enter a number of days into the field for when it should be hidden from view. By default it is set at 0.
Show the rate plan instead of hide: This box may be checked or unchecked. Check to show the Rate Plan (instead of hide).
Show on Web?: This box may be checked or unchecked. Check to show the Rate Plan for the web reservation system.
Override Rate: This box may be checked or unchecked. Check to show that the Rate Plan may be overridden manually if desired.
Non-Commisionable?: This box may be checked or unchecked. this box should be checked if the Rate Plan does NOT pay commission to travel agents.
Inactive?: This box may be checked or unchecked. This box can be checked if you no longer wish a Rate Plan to appear in a search in the system.
Base Rate: This box may be checked or unchecked. This box should only be checked if this Rate Type forms the base rate for your Property.
Calculated from the Base Rate: This box may be checked or unchecked. Any Rate Plans other than the base rate may be calculated from the base rate.
Note: IF THIS BOX IS CHECKED the Adjust Rates by $ and/or % fields will appear to allow the Rate Type to be adjusted by the choice of an amount or a percentage relative to the base rate.
Guest Type: This is a drop-down menu of available options. Choose one.
Segment: This is a drop-down menu of available options. Choose one.
Origin: This is a drop-down menu of available options. Choose one.
Note: Guest Types, Segments and Origins are all Property-defined codes used for marketing and reporting purposes to define your guests.
Automatically Charge Room and Tax when a Reservation is Made: This box may be checked or unchecked. if you wish to have the room and taxes charged at the time of the reservation when using this Rate Type, check this box.
Automatically Charge 1st Nights Room and Tax When a Reservation is Made: This box may be checked or unchecked. if you wish to have the first night charged at the time of the reservation when using this Rate Type, check this box.
Automatically Charge Amount when Reservation is Made: If you wish to have a specific amount charged at the time of the reservation when using this Rate Type, enter the amount in this field.
Automatically Charge Percent when Reservation is Made (ex. 10%): If you wish to have a specific percentage of the charges for the total room and taxes assessed at the time of the reservation when using this Rate Type, enter the amount in this field.
No automatic authorizations while the stay is in-house: This box may be checked or unchecked. If checked, no automatic authorizations will be allowed with this Rate Plan while the guest is in-house.
Automatically Charge the Balance during the check-in process: This box may be checked or unchecked. If checked, the balance due for the reservation room and taxes charges will be taken at check-in.
Posting Type (100 if not set): Posting Type 100 is room charges. If you wish this Rate Plan Type to charge to a different Posting Type, select it from those available in the drop-down menu.
Custom Confirmation Card: If you wish to use a custom confirmation card with this Rate Plan Type, select it from those available in the drop-down menu (for example Email confirmation). The selected custom confirmation will be sent as an email to guest reservations associated with this Rate Plan Type.
Signature Requested: By default, this box is unchecked. If you wish the confirmation card used with this Rate Plan Type to require a signature, check this box. The custom confirmation email sent to the guest will now contain a link for the document to collect the signature when using this Rate Plan Type.
Note: You MUST first select the custom confirmation document to be sent as the link in the e-mail. If no custom confirmation document is selected, no signature request will be sent, even if the box is checked.
Note: At this point, a new Rate Plan Type MUST BE SAVED to allow any of the additional sections on the tab to be completed.
Click the Save button (![]() ) in the local tool bar to save the Rate Plan Type.
) in the local tool bar to save the Rate Plan Type.
Saving a new Rate Plan Type will cause the 5 additional sections (Rate Rules, Dates this Rate Plan is Closed, Automatically Post Charges, UNIREZ Interface Mapping Codes or Default Packages for this Rate Plan) to become live, with the Add or Fast-Pick buttons for each section now displaying.
Information may now be added to any/all of these sections as desired for the Rate Plan Type.
Rate Rules can be applied to a Rate Plan Type to increase the rate by a dollar amount or a percentage based on the overall occupancy of the hotel or the number of that Rate Plan you want to sell on any given day, and to determine whether you want the increase to occur when the hotel reaches a certain overall occupancy percentage for a day or if a maximum number of that rate is sold before increasing the rate. This is also known as "yielding", with the yielded rate increasing as the occupancy increases.
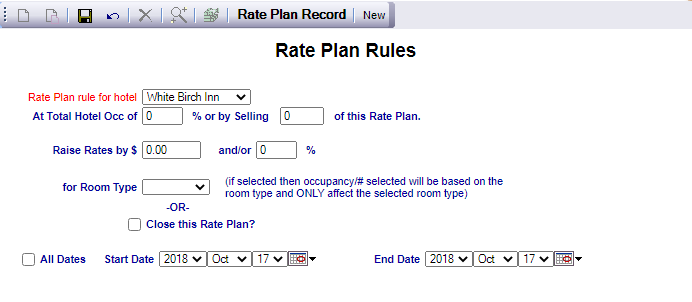
To set up a Rate Rule, click the Add button in the "Rate Rules" section area to open the Rate Plan Rules screen.
This screen has the necessary fields for you to complete to add Rate Rules to the Rate Plan Type.
Rate Plan rule for hotel: This is a drop-down menu of available options. Select one. This should be the default Property associated with the Rate Plan Type.
This field is required.
The next section is a script with fields to fill in.
First: Complete the fields with the desired numbers for hotel occupancy % or total rooms sold with this Rate Plan before the rates are raised, OR the Rate plan is closed. At least ONE of these fields MUST be completed for a Rate Rule to be applied.
Next: Raise Rates and select Room Type. If the rates are to be raised for the Rate Plan rather than simply closed when the occupancy reaches the desired levels, enter the amount, either a numerical value or a percentage of the Rate Plan, followed by selecting the desired Room Type from the drop-down menu (to select all Room Types, leave blank).
OR: If instead you wish to simply close this Rate when the occupancy reaches the desired level, check the "Close this Rate Plan?" box.
Once you have made your selections, move on to the Dates that the Rate Rules will apply.
All Dates: This box may be checked or unchecked. If checked, the Rate Rules will be applied to the Rate Plan on all dates.
If the Rate Rules are not to be applied at all times, select the Start and End Date using the drop-down menus or by clicking the Calendar icon. By default today's date will be displayed for both start and end dates.
Once the Rate Rules have been completed, you will need to click the Save button (![]() ) in the local tool bar before they are applied to the Rate Plan Type.
) in the local tool bar before they are applied to the Rate Plan Type.
When saved, the new Rate Rule will appear on the left of the Rate Plan Rules screen. You may now add/edit more Rate Rules, or return to the Rate Plan Type screen using the Rate Plan Record button in the local tool bar. The new Rate Rules will be displayed in the Rate Rules section.
Any Rate Rule in this section can be edited by clicking on the line entry to display it on the Rate Plan Rule screen, or deleted simply by clicking the red "X" at the right of the line entry.
Yielded Rates and any Yielded Variance for any stays may be viewed on the Room Rate Report.
You can also close out (not longer have available) a specific Rate for a day or date range.
To close out a Rate Type for a date or date range, click the Add button in the "Dates this Rate Plan is Closed" section area to open the Rate Plan Closed by Date Range screen.
Select the Date range you no longer wish the Rate to be available using the drop-down menus or by clicking the Calendar icon for both the Closed Start Date and Closed End Date options.
Reason: Enter a reason for closing out the Rate for the selected Dates.
These fields are all required to close the Rate Type.
Click the Save button (![]() ) in the local tool bar to apply to the Rate Plan Type.
) in the local tool bar to apply to the Rate Plan Type.
NOTE: Once the Rate has been closed out, it no longer appears in the Rate drop-down list for those dates.
When saved, the Rate Plan closure will appear on the left of the Rate Plan Closed by Date Range screen. You may now add/edit more Rate Plan closures, or return to the Rate Plan Type screen using the Rate Plan Record button in the local tool bar. The new closure Dates for the Rate Type is closed will be displayed in the Dates the Rate Plan is closed section.
Any entry in this section can be edited by clicking on the line entry to display it on the Rate Plan Closed by Date Range screen, or deleted simply by clicking the red "X" at the right of the line entry.
This section allows you to automatically post specific charges when this Rate Type is selected. For example, you may wish the Rate Type "CORP" to always be associated with a charge for lunch, or a Rate Type that allows pets may be associated with a charge per pet. The Posting Type may be attached to the Rate here and will then be automatically posted when a stay with that Rate Type is created. (When the stay is created, the recurring charges are listed on the folio definitions screen and automatically posted based on the frequency selected).
To select a Posting Type to automatically attach to this Rate Type, click the Add button in the "Automatically post these charges when this rate plan is selected" section area to open the Recurring Charges for (Rate Type code) screen.
This screen allows you to select the Posting Type, Amount, and Frequency for the recurring charge (daily, weekly, monthly).
Posting Type: Select the Posting Type you wish to add to the Rate Type from the drop-down menu of available options.
Amount: Enter the numerical amount here that you wish to be charged for the Posting Type when the Rate Type is selected.
Frequency: This is a drop-down menu allowing you to specify the frequency of the charge. Select from Daily, Monthly or Weekly.
These fields are required.
Type: You may also specify if the charge for this Posting Type is simply applied once with the Rate Type (the default option of None) or associated with the number of individuals (per adult, youth or child, or per pet) or per room. For example, you may wish a charge for lunch to be per adult, or a charge for including pets to be made per pet on the reservation. Select your preferred option from the drop-down menu.
All Dates: This box may be checked or unchecked. If checked, the Posting Type will be added to the Rate Type for all dates. By default it is checked. If it is unchecked, Start Date and End Date fields will appear on the screen for you to complete. Select the Date range using the drop-down menus or by clicking the Calendar icons.
Once your selections have been made, click the Save button (![]() ) in the local tool bar to attach a recurring charge to the Rate Plan Type.
) in the local tool bar to attach a recurring charge to the Rate Plan Type.
When saved, the added charge will appear on the left of the Recurring Charges for (Rate Type code) screen. You may now add/edit more Postings, or return to the Rate Plan Type screen using the Rate Plan Record button in the local tool bar. The new Posting Type(s) will now be displayed in the "Automatically post these charges when this rate plan is selected" section.
Any entry in this section can be edited by clicking on the line entry to display it on the Recurring Charges for (Rate Type code) screen, or deleted simply by clicking the red "X" at the right of the line entry.
To attach an interface mapping code to this Rate Type, click the Add button in the "UNIREZ Interface Mapping Codes" section area to open the Interface Lookup Table screen.
UNIREZ Rate Plan: To add an UNIREZ Interface Mapping Code to a Rate Type, you must enter the UNIREZ Rate Plan code in this field.
This field is required.
Description: Enter the description of the code here.
Once your information has been entered, click the Save button (![]() ) in the local tool bar to attach an UNIREZ Interface Mapping Code to the Rate Plan Type.
) in the local tool bar to attach an UNIREZ Interface Mapping Code to the Rate Plan Type.
When saved, the added Mapping Code information will appear on the left of the Interface Lookup Table screen. You may now add/edit more Mapping Codes, or return to the Rate Plan Type screen using the Rate Plan Record button in the local tool bar. The new UNIREZ Interface Mapping Code(s) will now be displayed in the "UNIREZ Interface Mapping Codes" section.
Any entry in this section can be edited by clicking on the line entry to display it on the Interface Lookup Table screen, or deleted simply by clicking the red "X" at the right of the line entry.
This section allows you to automatically add a Package when this Rate Type is selected. The Package may be attached to the Rate here and will then be automatically added to a reservation when a stay with that Rate Type is created. For example, you may wish the Rate Type "B&B" to be associated with a package providing breakfast.
To attach a default Package to this Rate Type, click the Add button in the "Default Packages for this Rate Plan (will default when attached to a stay)" section area to open the Package for this Rate Plan screen.
Package Name: Select the desired Package from the drop-down menu of available options.
Once your selections has been made, click the Save button (![]() ) in the local tool bar to attach a Package to the Rate Plan Type.
) in the local tool bar to attach a Package to the Rate Plan Type.
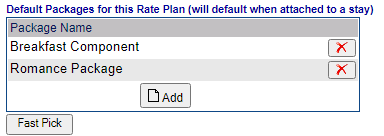
When saved, the added Package will appear on the left of the Package for this Rate Plan screen. You may now add/edit more Packages, or return to the Rate Plan Type screen using the Rate Plan Record button in the local tool bar. The new Package(s) will now be displayed in the "Default Packages for this Rate Plan (will default when attached to a stay)" section.
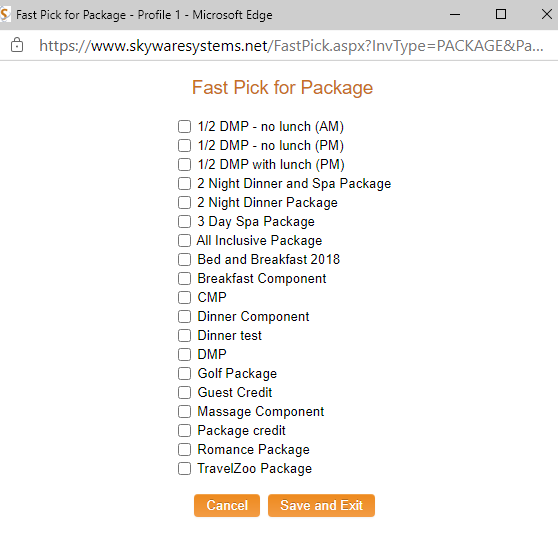
Note: This section also has a Fast Pick option button.
Clicking this button opens a pop-up window listing ALL available package options, and allows you to select MULTIPLE OPTIONS AT ONCE.
This option allows you to quickly add several Package options to a Rate Plan Type, and is the preferred option if you wish to add more than one Package to your Rate Plan Type creating a complex and unique Rate Plan Type swiftly and easily. Once your selections have been made, click the orange button Save and Exit. This will close the pop-up window and display any selections made in the "Default Packages for this Rate Plan (will default when attached to a stay)" section.
Any entry in this section can be edited by clicking on the line entry to display it on the Package for this Rate Plan screen., or deleted simply by clicking the red "X" at the right of the line entry.
Multiple sections appear on the Multi-Property / Other tab.
Note: These options will only be displayed if you are part of a multi-property interface user of Skyware.
Default Hotel: This is the default Property used for this Rate Type. If you have more than one Property you will be able to select the Property for this Rate Plan Type using the drop-down menu of available options.
This field is required when there are multiple properties.
This rate plan is available to all Properties?: This box may be checked or unchecked. This box should be checked if the Rate Plan is to be available at ALL Properties ONLY. By default it is unchecked. If it is checked, the Rate Type will be considered available at ALL your Properties in Skyware Systems. If you do not have this Rate Type available at every Property, leave it unchecked.
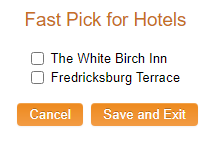
If the Rate Type is to be available at multiple but not all Properties, add them in the "This rate plan is specific to the Default Hotel and ONLY these properties" section, using the Fast Pick button
Click the Fast Pick button to open a pop-up window displaying the available Property options.
Select all Properties that this Rate Plan Type will be available, then click the orange button Save and Exit to return to the Rate Plan Maintenance screen.
Different Rate Plan Types may have different service requirements than usual for your Property. For example, a weekly Rate might only receive service once a week. If so, use the elements in this section to define the room service options for the Rate.
No Room Service: This box may be checked or unchecked. If there is to be no service with this Rate Plan Type, check this box.
Set Rooms Service Pattern: Click this button to set the room service pattern for the dirty flag. A pop-up window will appear for you to make your selection.
Set Sheets Service Pattern: Click this button to set the sheets service pattern for sheet changes. A pop-up window will appear for you to make your selection.
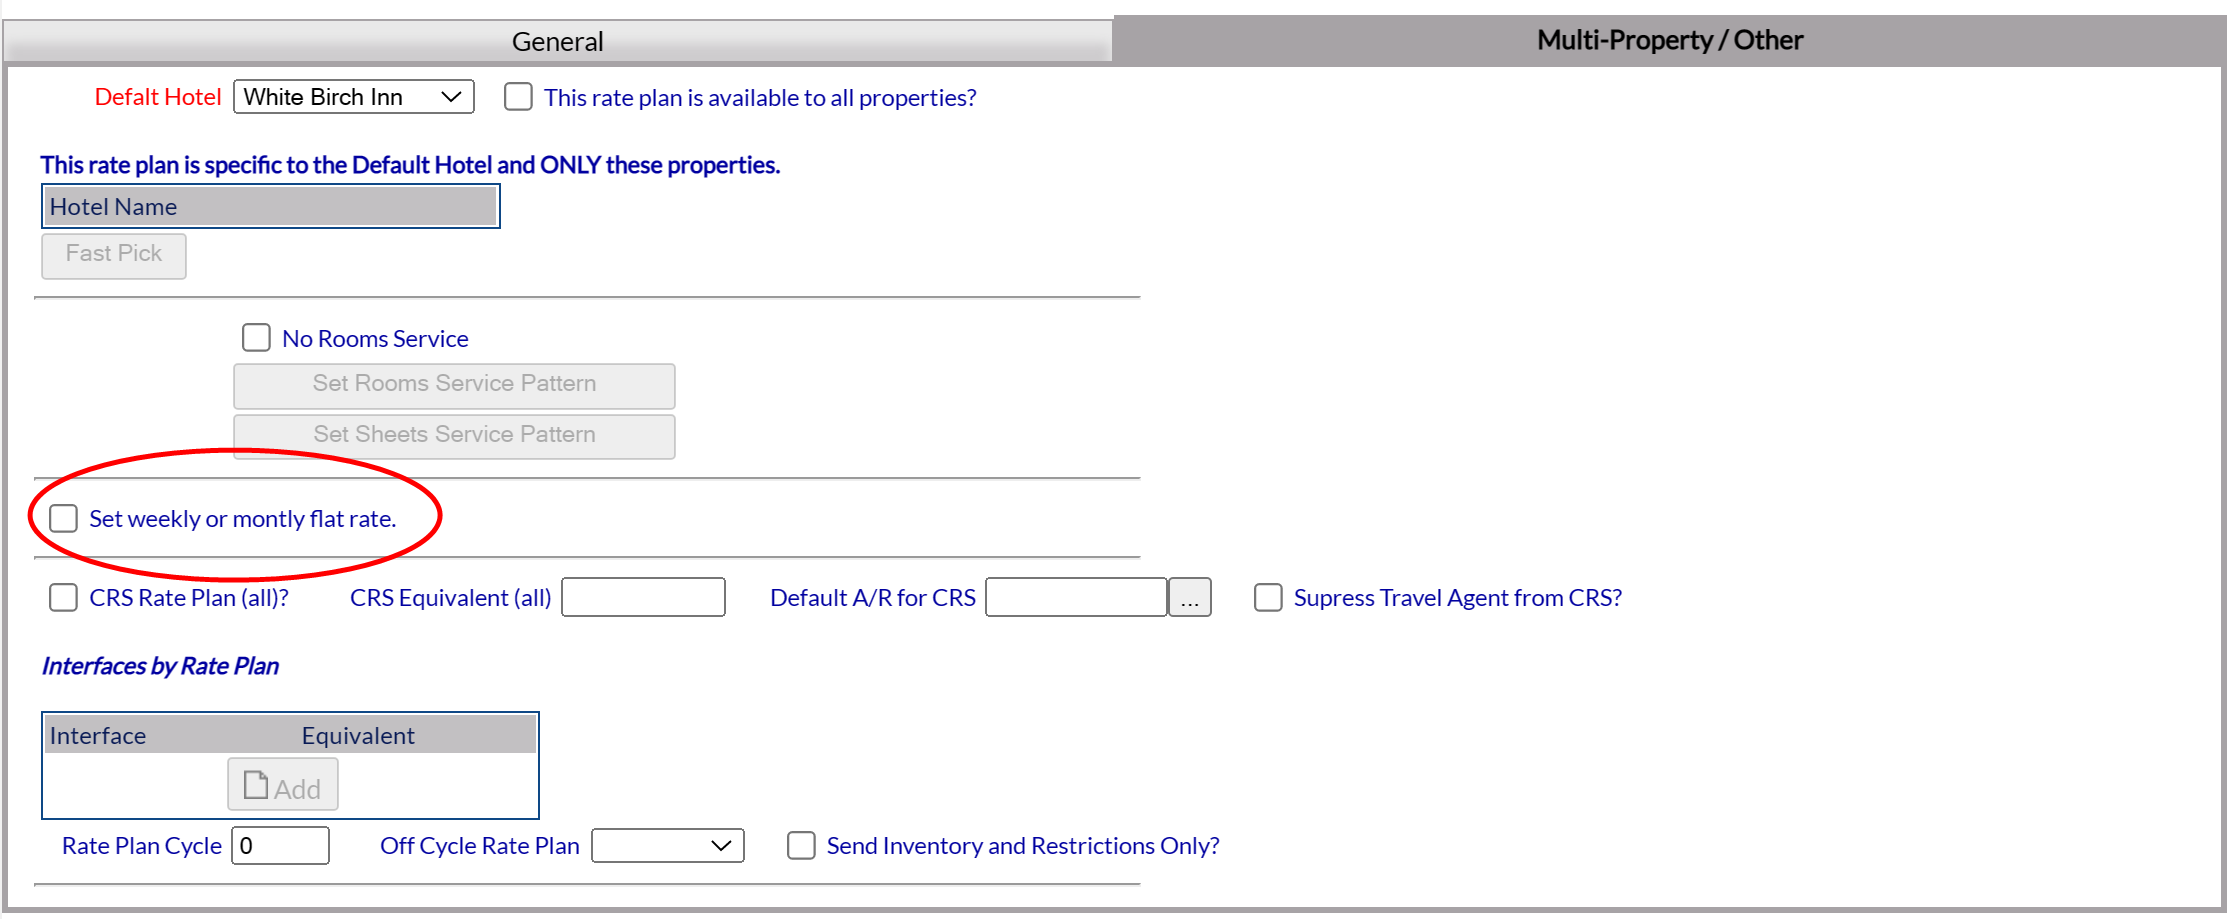
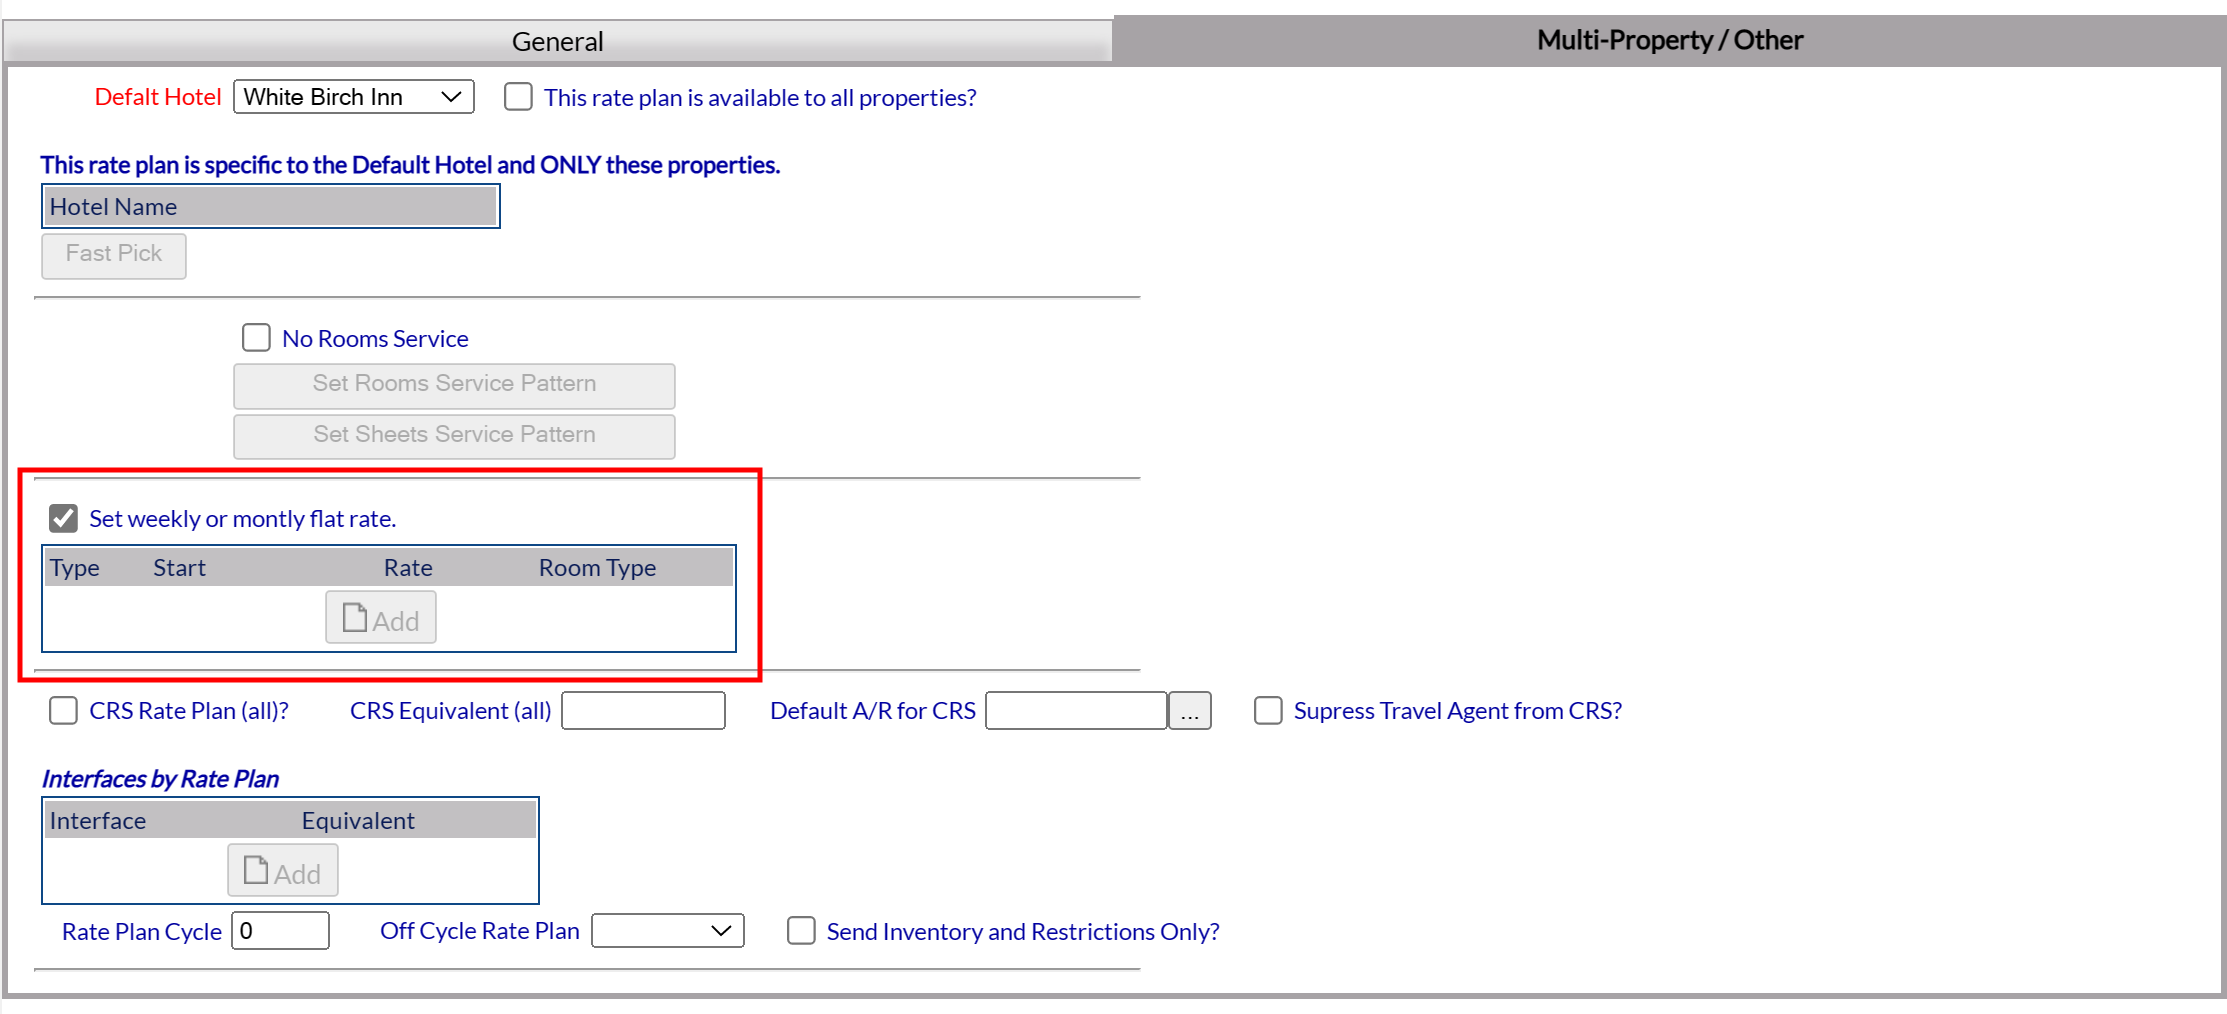
The option to set a Monthly or Weekly flat rate has been added to Skyware. This gives you the option for any Rate Plan Type to set the rate for each day without having to go to Maintain Rates. Instead, the last day of the period will hold the offset or remainder. By default, this is NOT set, but you may choose to activate this option using the check box here.
Selecting this option opens the section for adding the flat rate.
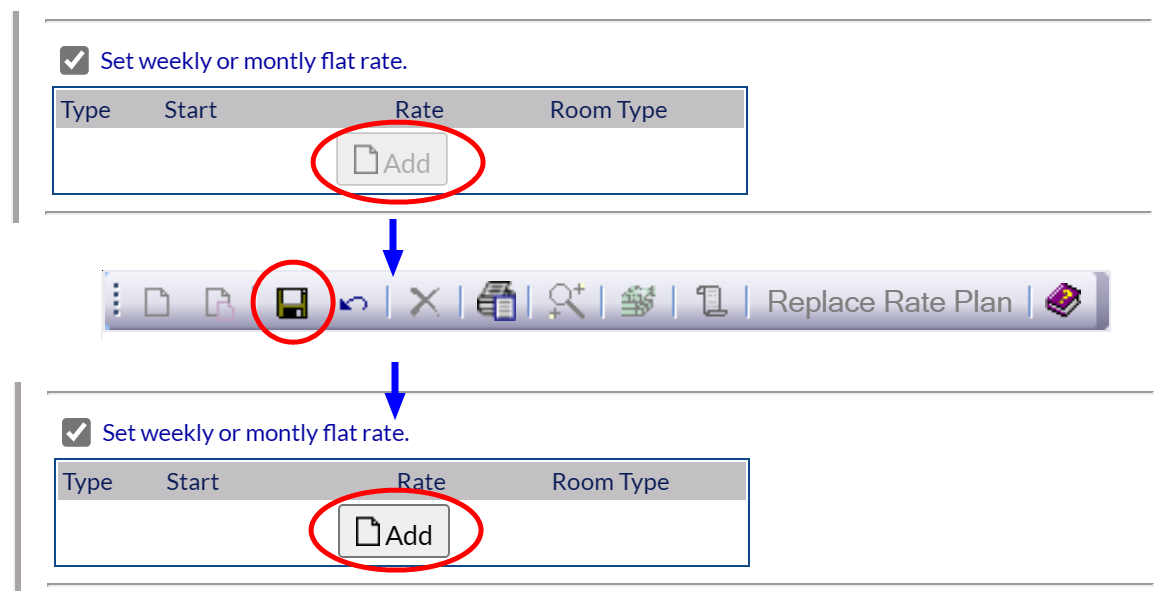
Note: When first shown, the section is not active. You MUST save the change first to make the Add button in the section available.
Click the Add button to open the Flat Rates screen, where you can set the flat rate details for the selected rate plan type.
The Flat Rates screen display is split into two frames, with the left side of the screen listing any already configured flat rates for the Rate Plan Type and the right side containing the fields you need to complete in order to add or edit a flat rate for the Rate Plan Type. Any changes made on the right, once saved, will be updated in the listings to the left.
Type: Type of cycle for this rate. This is a drop-down menu allowing you to select either weekly or monthly. By default, weekly is selected.
This field is required.
Start: Day the rate takes effect. Click on this field to display a monthly calendar and choose the date you wish this rate to take effect for the selected Rate Plan Type.
This field is required.
Rate: The Flat Rate. Enter the desired amount into this field manually. By default it is set as 0.00; you should change this to what you wish it to be.
This field is required.
Starts On: The day the time period (Type) starts for generating rates. This is a drop-down menu allowing you to select either the beginning of the month, or the arrival date. By default, beginning of the month is selected.
This field is required.
Room Type: Room Type this (flat rate) Rate Plan Type may be used with. This is a drop-down menu allowing you to select the specific room type the flat rate may be used with. By default it is left blank, meaning ALL room types may use it.
Note: If you wish to use a flat rate with multiple room types but not all room types, you must generate and add a flat rate for EACH room type.
When you are finished adding or editing a flat rate, click the Save ![]() button to save the changes. The newly generated flat rate will appear on the left side of the screen (and is now associated with the specific Rate Plan Type used to open this screen).
button to save the changes. The newly generated flat rate will appear on the left side of the screen (and is now associated with the specific Rate Plan Type used to open this screen).
You may generate multiple flat rates using the new or replicate buttons in the local tool bar, make a new entry for each flat rate desired.
Note: ALL flat rates shown on the Flat Rates screen are specific to the Rate Plan Type used to enter this screen. To use a flat rate with another Rate Plan Type, you must open the specific Rate Plan Type and add it via the Flat Rate screen for that Rate Plan Type.
Once all the desired flat rates have been added on this screen you may return to the Rate Plan Type screen by clicking the Rate Plan Record button in the local tool bar.
This will return you to the Rate Plan Type Maintenance screen, where the Flat Rates added will now be shown in the Flat Rates section.
Note: Any entry in this section can be edited by clicking on the line entry to display it on the Flat Rates screen, or deleted simply by clicking the red "X" at the right of the line entry. Removing it here will also remove it from the Flat Rates screen.
The Interface is the external distribution hub for this Rate Plan Type, known as the CRS (central reservation system). Your Property may also use a GDS (Global Distribution System) or OTA (Online Travel Agent, such as Expedia). The codes used by your Property may differ to that used in Skyware Systems. This section enables you to ensure that if the Rate Plan Type is to be used with any of these interface options, you can communicate efficiently with the CRS via Skyware.
CRS Rate Plan (all)?: This box may be checked or unchecked. Is this a Rate Plan used for all CRS interfaces? If so, check this box. By default it is unchecked.
CRS Equivalent (all): Enter the CRS equivalent code for all Rate Plans in this field.
Default A/R for CRS: Enter the default A/R account to use for a CRS/GDS reservation in this field.
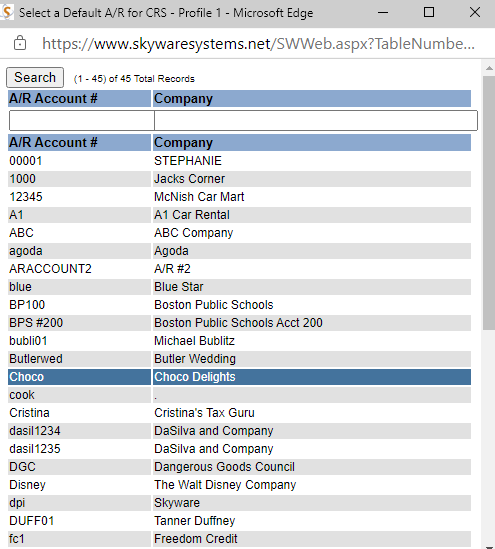
You may if wished use the search option box next to this field to find the correct A/R account. Click on the gray search box (to the right of the field) to open a pop-up window listing the available A/R accounts to select a default A/R for a CRS from.
Click on any entry to automatically close the pop-up window and enter your selection into the Default A/R for CRS field.
Suppress Travel Agent from CRS?: This box may be checked or unchecked. By default it is unchecked. If checked, the IOTA# for the OTA will not be attached to a guest reservation.
Interface by Rate Plan: If this Rate Plan will NOT be used for ALL CRS interfaces, this section allows you to choose the Interface and add its CRS equivalent, if desired.
Select the Rate Plan interface(s) to attach by using the Add button in this section to open the Interfaces / Rate Plan Mapping screen.
Interface: This is a drop-down menu of available Interface options. Select one.
CRS Equivalent: Enter the CRS equivalent to the Interface in this field.
Once your information has been entered, click the Save button (![]() ) in the local tool bar. You may now add/edit more Interfaces or return to the Rate Plan Type screen using the Rate Plan Record button in the local tool bar.
) in the local tool bar. You may now add/edit more Interfaces or return to the Rate Plan Type screen using the Rate Plan Record button in the local tool bar.
Rate Plan Cycle: How many days will this Rate Plan cycle? Enter the number in the field. By default it is 0.
Off Cycle Rate Plan: This is a drop-down menu of available Rate Type options. Select one if you have entered a number into the Rate Plan Cycle field. This is the Rate Type that the reservation will switch to after the Rate Plan has cycled through the number of days entered.
Send Restrictions only?: This box may be checked or unchecked. By default it is unchecked.
When you are finished adding or editing Rate Plan Types, click the Save ![]() button to save the changes.
button to save the changes.
To view any changes made, click the Activity log ![]() button in the local tool bar.
button in the local tool bar.

